- IKEA Sofa Covers
- Curtains up to -15%
- All products
- Curtains up to -15%
- Blackout curtains
- Lined curtains
- Voile and net curtains
- Curtain accs
- Roman blinds
- All products
- Shop by style
- Made to Measure Roman blinds ✂
- Double layered Roman blinds DUO
- Blackout Roman blinds
- Regular edge Roman blinds
- Tab top Roman blinds
- Lined Roman blind
- Plain frill edge Roman blinds
- Wave frill Roman blinds
- Slot top Roman blinds
- Semi-transparent Roman blinds
- Voile Roman blinds
- Relaxed Roman blinds
- Up-down pleated roman blind
- Shop by colour
- Shop by fit
- Blinds accs
- Blinds
- Roller blinds
- Pleated blinds
- Fabric collections
- Cushions
- All products
- Cushion covers
- Cushions by colour
- Decorative pillows
- Kitchen Textiles
- Accessories
- Shop by Room
- Fabrics
- All products
- Discover fabrics
- Fabric collections
- All products
- All fabric collections
- Alara Premium
- Amsterdam
- Aria
- Avinon
- Balance
- Blackout Double
- Blackout FR Premium
- Blackout Soft
- Botanic Viscose
- Boucle Mist new
- Boucle Teddy
- City
- Cosy Home
- Crema
- Damasco
- Delicate Premium
- Dimout
- Edinburgh
- Etna
- Flowers
- Gardenia
- Harmony
- Hemp Blend new
- Ingrid
- New arrivals
- Balconies & terraces 🌼
Bring summer into your home! Curtains up to -15% Buy now
Bring summer into your home! Curtains up to -15% Buy now
Bring summer into your home! Curtains up to -15%
Buy now
















Menu


- IKEA Sofa Covers

- Curtains up to -15%
- All products
- Curtains up to -15%
- Blackout curtains
- Lined curtains
- Voile and net curtains
- Curtain accs
- Roman blinds
- All products
- Shop by style
- Made to Measure Roman blinds ✂
- Double layered Roman blinds DUO
- Blackout Roman blinds
- Regular edge Roman blinds
- Tab top Roman blinds
- Lined Roman blind
- Plain frill edge Roman blinds
- Wave frill Roman blinds
- Slot top Roman blinds
- Semi-transparent Roman blinds
- Voile Roman blinds
- Relaxed Roman blinds
- Up-down pleated roman blind
- Ready-made curtains
- Shop by colour
- Shop by fit
- Blinds accs
- Blinds
- Roller blinds
- Pleated blinds
- Fabric collections
- Roller blinds
- Cushions
- All products
- Cushion covers
- Cushions by colour
- Decorative pillows
- Kitchen Textiles
- Accessories
- Shop by Room
- Fabrics
- All products
- Discover fabrics
- Fabric collections
- New arrivals
- Outlet IKEA covers
- Shop the Look
- Contact Us
- Balconies & terraces 🌼
Mounting window pleated blinds
Invasive installation (screw-fixed)
1. Preparing the installation area
Mark the fixing points on the window sash. The fixing holes are made in the glazing bead, perpendicular to its surface.
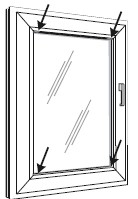

2. Preparing the mounting bracket
The mounting bracket is 10 mm × 10 mm. To mark the fixing position accurately, use the measuring gauge supplied.
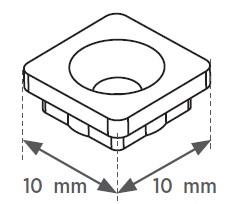
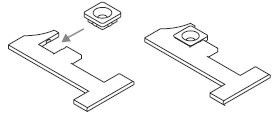
3. Fixing the mounting bracket
Fix the bracket to the glazing bead using a screw. Tighten the screw firmly, but without excessive force. After fixing, the bracket must sit flush against the glazing bead and be securely in place.
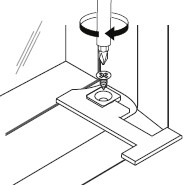
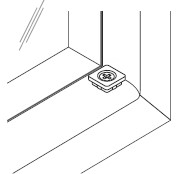
4. Installing the pleated blind on the brackets
After fitting all brackets (top and bottom), place the locking parts of the pleated blind onto the prepared mounting brackets. Slide the locking parts into the brackets until they click/seat firmly. Ensure the cords are positioned correctly: they must run parallel and must not cross.
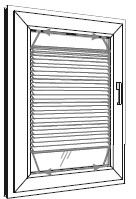
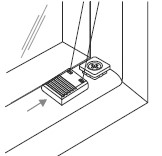
5. Installation complete / adjustment
Once all parts are installed, the pleated blind is ready for use. Check correct operation by moving the blind up and down. After confirming proper operation, trim the protruding cord ends.
If the blind hangs too loosely or lowers by itself, it must be adjusted by shortening the cords. Adjustment is made by gradually shortening the cords by tying the next knot above the previous one. This must be done very precisely: shorten the cords in small increments and check the blind operation each time until the correct effect is achieved.
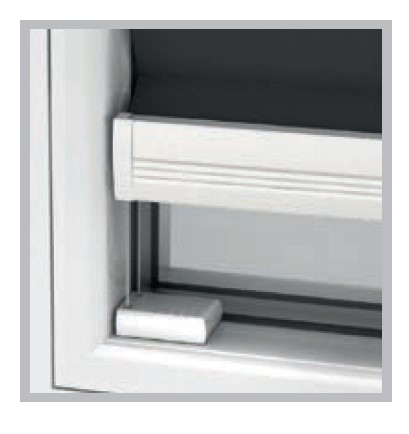
Non-invasive installation (no drilling)
1. Preparing the installation area
Non-invasive installation is carried out on the top and bottom edge of the window sash, without drilling.
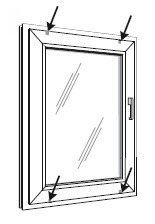
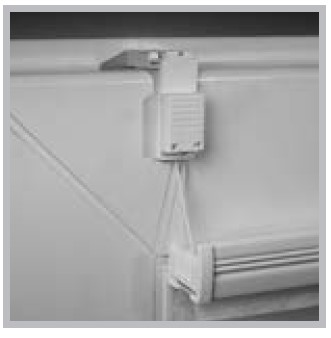
2. Fitting the brackets onto the window sash
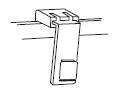
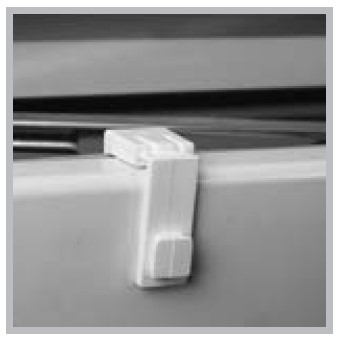
The set includes mounting brackets that can be adjusted to different window frame thicknesses, from 10 mm to 25 mm.
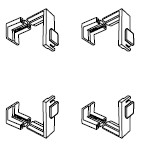
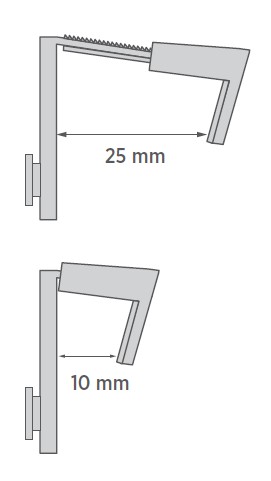
Slide the bracket onto the edge of the sash (top and bottom) so that it sits firmly against the frame. The bracket must be seated evenly and securely, without play.
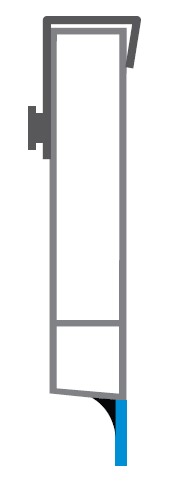
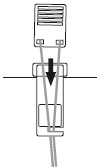
3. Routing the cord through the bracket
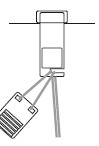
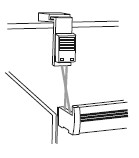
Route the pleated blind cord through the mounting bracket, following the direction shown in the diagram. Ensure the cords are positioned correctly: they must run parallel and must not cross. Note: due to the position of the mounting bracket, the cords may twist slightly at one point.
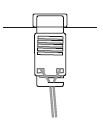
4. Locking the cord in the bracket
After routing the cord correctly, snap the locking element into place by pressing it into the bracket.
This prevents the cord from slipping out and ensures correct operation of the pleated blind.
5. Installation complete / adjustment
Once all parts are installed, the pleated blind is ready for use.
Check correct operation by moving the blind up and down. After confirming proper operation, trim the protruding cord ends.
If the blind hangs too loosely or lowers by itself, it must be adjusted by shortening the cords. Adjustment is made by gradually shortening the cords by tying the next knot above the previous one. This must be done very precisely: shorten the cords in small increments and check the blind operation each time until the correct effect is achieved.
 produced sustainably
 99% satisfied
 delivery in

 SSL certificate
 competent