- IKEA Sofa Covers
- Curtains up to -15%
- All products
- Curtains up to -15%
- Blackout curtains
- Lined curtains
- Voile and net curtains
- Curtain accs
- Roman blinds
- All products
- Shop by style
- Made to Measure Roman blinds ✂
- Double layered Roman blinds DUO
- Blackout Roman blinds
- Regular edge Roman blinds
- Tab top Roman blinds
- Lined Roman blind
- Plain frill edge Roman blinds
- Wave frill Roman blinds
- Slot top Roman blinds
- Semi-transparent Roman blinds
- Voile Roman blinds
- Relaxed Roman blinds
- Up-down pleated roman blind
- Shop by colour
- Shop by fit
- Blinds accs
- Blinds
- Roller blinds
- Pleated blinds
- Fabric collections
- Cushions
- All products
- Cushion covers
- Cushions by colour
- Decorative pillows
- Kitchen Textiles
- Accessories
- Shop by Room
- Fabrics
- All products
- Discover fabrics
- Fabric collections
- All products
- All fabric collections
- Alara Premium
- Amsterdam
- Aria
- Avinon
- Balance
- Blackout Double
- Blackout FR Premium
- Blackout Soft
- Botanic Viscose
- Boucle Mist new
- Boucle Teddy
- City
- Cosy Home
- Crema
- Damasco
- Delicate Premium
- Dimout
- Edinburgh
- Etna
- Flowers
- Gardenia
- Harmony
- Hemp Blend new
- Ingrid
- New arrivals
- Balconies & terraces 🌼
Bring summer into your home! Curtains up to -15% Buy now
Bring summer into your home! Curtains up to -15% Buy now
Bring summer into your home! Curtains up to -15%
Buy now












Menu


- IKEA Sofa Covers

- Curtains up to -15%
- All products
- Curtains up to -15%
- Blackout curtains
- Lined curtains
- Voile and net curtains
- Curtain accs
- Roman blinds
- All products
- Shop by style
- Made to Measure Roman blinds ✂
- Double layered Roman blinds DUO
- Blackout Roman blinds
- Regular edge Roman blinds
- Tab top Roman blinds
- Lined Roman blind
- Plain frill edge Roman blinds
- Wave frill Roman blinds
- Slot top Roman blinds
- Semi-transparent Roman blinds
- Voile Roman blinds
- Relaxed Roman blinds
- Up-down pleated roman blind
- Ready-made curtains
- Shop by colour
- Shop by fit
- Blinds accs
- Blinds
- Roller blinds
- Pleated blinds
- Fabric collections
- Roller blinds
- Cushions
- All products
- Cushion covers
- Cushions by colour
- Decorative pillows
- Kitchen Textiles
- Accessories
- Shop by Room
- Fabrics
- All products
- Discover fabrics
- Fabric collections
- New arrivals
- Outlet IKEA covers
- Shop the Look
- Contact Us
- Balconies & terraces 🌼
Roller Blind Installation
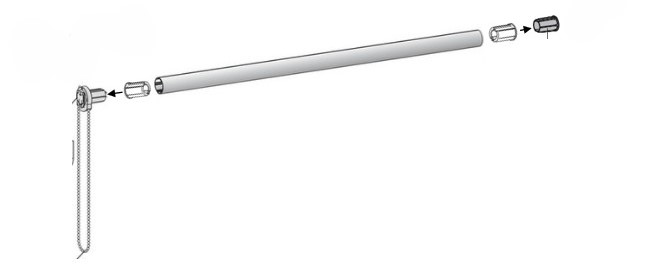
The roller blind with fabric wound onto the tube and the control mechanism are supplied as separate parts. When fitting the control mechanism into the roller tube, choose the side on which the operation chain will be located.
Push the control mechanism fully into the roller tube as shown in the diagram. No additional adjustment is required. If in doubt, refer to the assembly diagram.
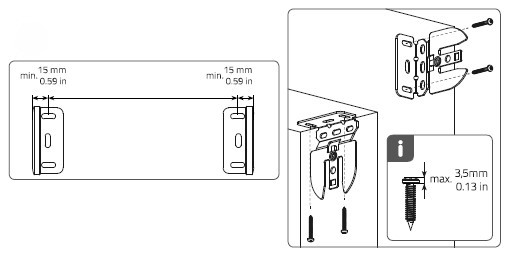
1. Fixing the metal brackets
Before installation, mark the drilling points.
Select wall plugs suitable for the mounting surface. Wall plugs are not included in the set.
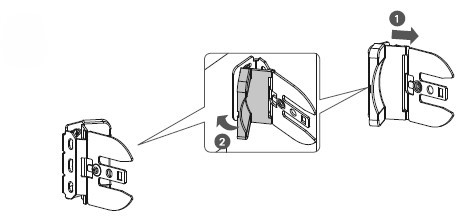
2. Fitting the screw caps
Slide the plastic screw caps onto the installed brackets and clip them into place until they are firmly seated.
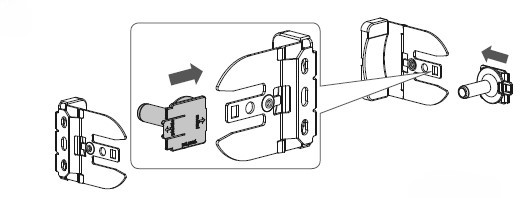
3. Fitting the idle end support (tube end fitting)
First, locate the end without the control mechanism. Insert the roller tube into the previously fitted end support.
4. Installing the roller tube
First, locate the end without the control mechanism. Insert the roller tube into the previously fitted end support.
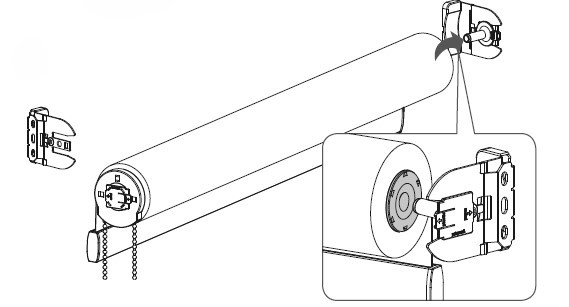
Then press the other end in until the tube clicks into the bracket correctly.
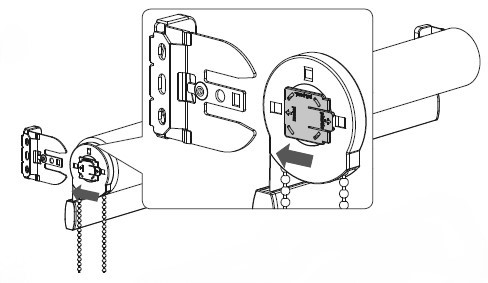
5. Fitting the bracket covers
Once the tube is correctly seated, fit the plastic bracket covers by sliding them on from the front until fully in place.
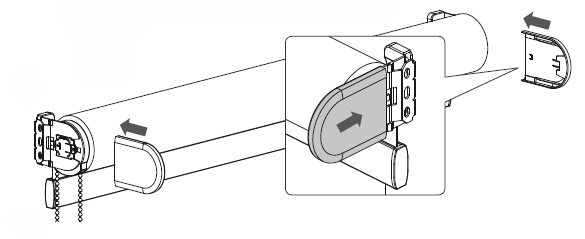
6. Fitting the chain weight or chain guide
Fit the weight onto the operating chain, or fix the chain guide (supplied) to the wall at a suitable height.
7. Checking operation
After installation, check that the blind operates correctly by raising and lowering the fabric. The operating chain should hang vertically and the blind should move smoothly.
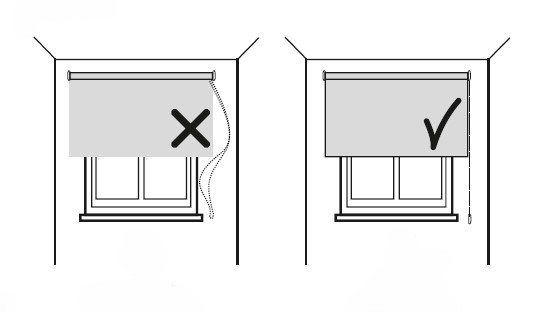
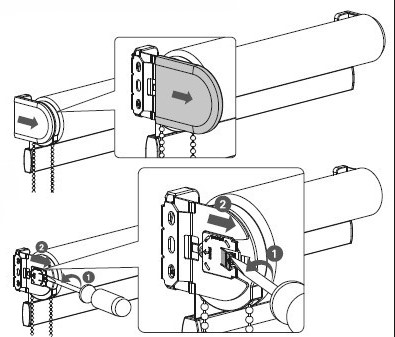
8. Removing the blind
First remove the bracket covers. Then release the blind by gently levering back the locking tab (the flat plastic piece on the side of the blind), e.g. with a flat-head screwdriver, while pulling the blind out of the bracket. Carry out this step carefully to avoid damaging the mechanism or mounting parts.
 produced sustainably
 99% satisfied
 delivery in

 SSL certificate
 competent